The process of prototype fabrication is really a series of problem-solving exercises. Slot A suddenly refuses to accept Tab B, the beautiful CAD model reveals monstrous qualities when it emerges from the 3D printer, the Arduino code refuses to compile. We always find ourselves doing lots of just-in-time self-education, reading product manuals and watching YouTube HOWTO videos.
In brief, here are some of the most valuable lessons learned from our summer design sprint:
Listen beautiful relax classics on our Youtube channel.
Vacuum Forming Polycarbonate
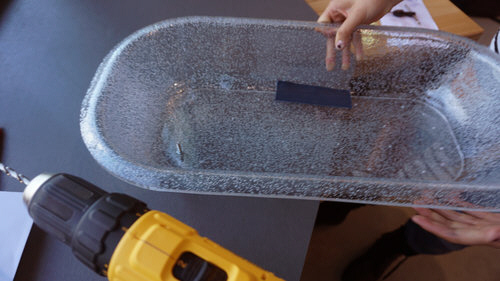 So many bubbles! This bassinet is meant to be transparent.
Vacuum-forming clear quarter-inch thick polycarbonate sheets isn’t for amateurs! We milled molds out of stacked sheets of MDF (medium-density fiberboard), both to accommodate the limited z-height of the ShopBot CNC and to machine vacuum-channels in the middle layers. Before vacuum-forming, we had to bake the heavy polycarbonate sheets and the mold in a brick oven, or else it would develop thousands of little bubbles that made the material cloudy (see above). Unfortunately, the MDF molds took a beating from the hot polycarbonate, and after a few pulls, the polycarbonate started tearing chunks out of the mold. No mold lasts forever–even the hardened steel tools that LEGO uses for injection molding eventually wear out. Next time, we might skip MDF and instead cut a tool from the more expensive but more robust renshape.
Cleaning 3D Printed Parts
Parts from the 3D printer often come out of the machine with scratchy surfaces or other imperfections, for example marks left by the “raft” or other support material. We’ve learned that if you plan to sand the part to make it smooth and more aesthetically appealing, you are essentially committing to covering the sanded part with bondo and finishing paint. Sanded parts, especially those made from light-colored PLA, just seem to magnetically attract grubbiness. It might be skin oil from handling, smudgy whatever from dirty surfaces, but the part soon looks dingy. If you don’t have the time to sand, bondo, prime and paint, we recommend you remove the unwanted material with a chisel, blade or other scraper rather than sandpaper.
Working With Nichrome Wire
 Enter the bare metal butt crimp
The Otter prototype was an opportunity to learn a lot about nichrome heating wire. Here’s the challenge: you want to establish an electrical connection with a wire that immediately heats up when you introduce a current. Soldering this kind of wire won’t work (solder melts when it gets hot). Automotive crimp connectors, which have plastic housings, don’t work (think: melting plastic). In the end, we learned that the best connectors involve mechanical clamping, for example a bare metal butt crimp (which sounds like an awesome band name), or a screw terminal.
Powering Arduino With A Buck Converter
We’ve powered countless little Arduino projects either (1) directly from the computer through a USB cable, (2) with a rechargeable lithium cellphone powerpack and a USB-B connector (Arduino Uno) or micro-USB connector (Arduino Micro), or (3) a 5V alkaline battery pack wired to the Vin pin.
For the Otter prototype, we needed the Arduino to control a relay that was sending 24V to the heater wires. It was easy to generate 24V using an off-the-shelf AC adapter power supply, but how could we also get 5V to power the Arduino without using a second power supply? Enter the humble and amazing buck converter–an inexpensive component that can efficiently generate an output of 3-12V given a 24V input. Presumably this is old hat to any electrical engineer. There exist countless varieties of “DC/DC step-down” or buck converters (ie Adafruit), so you ought to be able to find one that’s a perfect match for your project.
Cloud-Based CAD File Sharing
Autodesk’s cloud-based CAD server, called A360 (aka the web interface for Fusion360), is an amazing collaboration tool. We were able to generate CAD models on the big ThinkStation P910 desktop machines in the DtM studio, and then instantly open the same files on our ThinkPad P50 laptops when we were working at the CNC machine. Hooray for a cloud-storage system that actually works as advertised!
DON’T SHAVE THAT YAK!
Any kind of production rush can easily devolve into fun adventures in “yak shaving“: you were supposed to be testing the prototype thermal control system, and two hours later you find yourself wandering the aisles at Home Depot in search of T-handled allen wrenches.
 HOWTO replace a lightbulb
_____________________________________
This “Design Experience that Matters” series is provided courtesy of Timothy Prestero and the team at Design that Matters (DtM). As a nonprofit, DtM collaborates with leading social entrepreneurs and hundreds of volunteers to design new medical technologies for the poor in developing countries. DtM’s Firefly infant phototherapy device is treating thousands of newborns in 21 counties from Afghanistan to Zimbabwe. In 2012, DtM was named the winner of the National Design Award.
![]()
Source: core77