
Photo: Jennylynn Fields via Shutterstock
This post may contain affiliate links. If you make a purchase, My Modern Met may earn an affiliate commission. Please read our disclosure for more info.
Whether you want to call it fluid art, liquid art, or acrylic pouring, there’s nothing more satisfying than creating abstract masterpieces by letting pigment run amok. This form of abstract art uses acrylics with a runny consistency to create psychedelic paintings. There are endless creative possibilities thanks to different ways to combine acrylic paints and there’s something so satisfying about watching it spill across a surface.
Listen beautiful relax classics on our Youtube channel.
Getting started with acrylic pouring isn’t particularly difficult, making it a great art form for all skill levels. With so many techniques to try, you can get as simple or complicated as you’d like. At its core, fluid art allows you to learn a great deal about materials and is great for experimenting with color and technique. It’s also fun for all ages!
Acrylic Pouring Supplies

Best Paint for Acrylic Pouring
The key to a good acrylic pour is consistency…of paint that is. You’ll want to use fluid acrylics, which have a much thinner consistency than heavy body acrylics. If you only have thicker acrylics on hand, you can still use them, but you’ll want to thin them out with water.
Some people have great success by simply using craft paints (Apple Barrel and Americana are two popular brands), but if you want an artwork that is long lasting, we suggest going with professional grade fluid acrylics. Golden Fluid Acrylics and Liquitex Soft Body Acrylics are great choices for their strong pigments and lightfastness.
Pouring Mediums
While fluid acrylics have a high viscosity, you will still want to add something to create the consistency you are after. What you will add depends on whether you are doing a coated pour, where the finished product has bold, even layers of color, or a wash pour, where the finished product almost looks like layers of watercolor.
To get the viscosity and pouring rate you’d like, you can first adjust with water. Fluid acrylics won’t need much—if any—to be added; and for a coated pour, only a small amount in a 1:10 ratio should be added. Adding more water will also change how well the paint adheres to your surface, so try not to go above a 1:1 ratio, which is what is recommended for wash pours. By experimenting and changing things up, you’ll discover all types of fun effects.

Beyond water, a good pouring medium is key. Liquitex Professional Pouring Medium is a popular choice for its ability to create even sheets and puddles while promoting drying. GAC 800 is another quality pouring medium, as it helps prevent fissures from appearing. Known as crazing, the fissures appear due to uneven drying times between lower and top levels. One downside of GAC 800 is that it can become slightly cloudy when dry, so it isn’t great to use as a clear topcoat. If you are looking to get started without investing too much, Floetrol is another pouring medium that is effective without breaking the bank.
Isopropyl alcohol can also be added to pours to create interesting circular cells, which occur when the fast drying alcohol tries to escape. A ratio of 2 parts pouring medium to one part acrylic and one part isopropyl alcohol will give great results.
There are also quite a number of people who use glue, silicon, and oils ranging from motor oil to coconut oil to either create cells or serve as pouring mediums. All can yield interesting results but may diminish the longevity of your painting as they can change the properties of the paint.

Photo: Jennylynn Fields via Shutterstock
Supplies to Start Pouring Paint
Many people start out using canvases for their fluid art. To get the best results, try preparing your canvas with a layer of gesso so that it will hold the weight of the paint better. As canvas can buckle a bit under too much weight, causing the surface to become uneven, prepared artist panels are often the safest choice.
Another essential of liquid art is keeping your space clean! Obviously, this is an art form that can get messy, so plastic sheets to keep your table or floor from getting colorful is critical. Other must-haves include clear plastic cups, squeeze bottles, and wood stirrers. Palette knives will help you spread and even paint toward the edges and a heat torch can remove bubbles and bring cells out in specific areas. You’ll also want a nice clear topcoat to seal off your work once it’s finished.
Acrylic Pouring Techniques
Experimentation is key, but two basic techniques for pouring paint will get you started on a journey to creating your own psychedelic masterpiece—straight pouring and dirty pouring. We’ll dive deeper into what each of these methods entails, but whichever technique you choose, you’ll want to make sure you’re working on a level surface to ensure you get the best results possible, both while pouring and when leaving the painting to dry.
Listen beautiful relax classics on our Youtube channel.
Straight Pour

Photo: Priscilia Salinas via Shutterstock
A straight pour is simply when you individually add color to your surface, building up layers as you go. One method involves pouring “puddles” of individual colors that are then manipulated to move across the surface as the canvas is tilted in different angles. Straight pours can provide nice, crisp color lines when doing a coated pour or feathery effects when creating a wash pour. You can also swipe them with all types of instruments to create different effects.
Dirty Pour
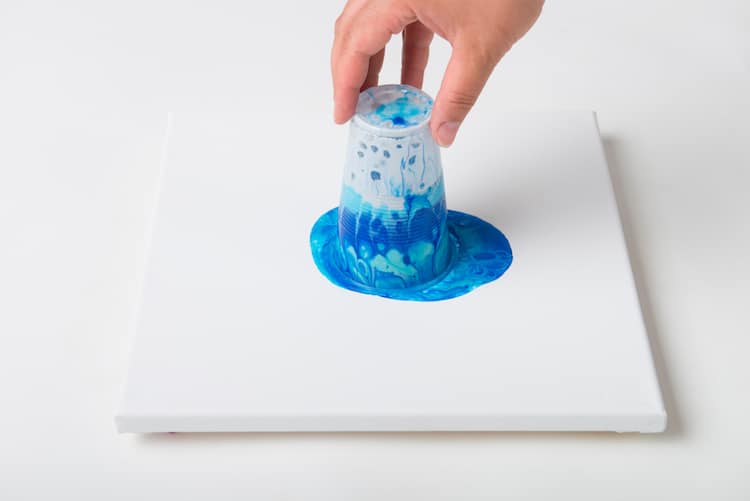
Photo: Jennylynn Fields via Shutterstock
With the dirty pour technique, all your paints are placed into one cup prior to being poured across the panel or canvas. Consistency is key here—if the paints are too runny they will blend together in the cup and come out muddy. This technique won’t work well for wash pours, where the colors are quite thin. Dirty pours are great because they’re so instinctive and you never know what will come out of the cup. Once you get a feel for the densities you can create with different colors, and you’ll see that anything is possible.
To get even more spontaneous, try a flip cup or a funnel pour. With a flip cup, you’ll want to place your canvas on the top of your vessel once it’s filled with color. Flip the entire thing upside down and then slowly lift the cup, allowing the colors to spill over the surface. To do a funnel pour, block the pouring end of the funnel while you fill it with paint. Once you are ready, position the funnel over your canvas or panel and let the paint drizzle from the funnel as you move it around.
Looking to get more advanced learning?
Rick Cheadle’s Fluid Art Recipes and Art Journal is filled with over 100 pouring recipes to take your art even further and YouTube is filled with tutorials from knowledgeable experts like Nicky James Burch from Fluid Art Studios and Gina DeLuca.
Next: Watch some of our favorite creatives as they produce fluid art.
The post Fluid Art: How to Start Acrylic Pouring & Create Psychedelic Abstract Paintings appeared first on My Modern Met.
Source: mymodernmet.com