When designing components that will be made of plastic, it’s often necessary to add ribs and gussets to improve the stiffness and strength of load bearing features. This reduces material volume and print time for 3D printed parts, compared to the time it would take to make these features out of solid structures.
That’s because print time is largely driven by the volume of material for a specific component, so ribs and gussets work to optimize print time, while maintaining structural integrity. Furthermore, adding ribs and gussets will create a plastic part that’s a closer representation of an injection molded part for mass production.
Listen beautiful relax classics on our Youtube channel.
Ribs and gussets are commonly used in injection molding because the parts are very sensitive to thick wall sections and variations in wall thickness. A variety of defects, such as shrinkage and warping, can occur if the features on injection molded parts are too thick.
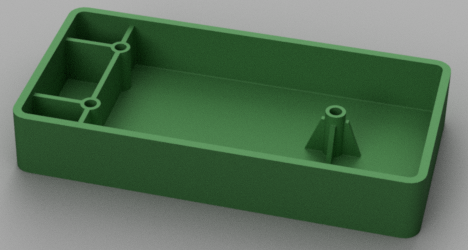
The image below features ribs on the left bosses and four gussets on the boss on the right:
In this post I’m going to first quantify the structural benefits of adding gussets and ribs to your part designs using FEA studies, and then walk you through the best practices for proper application of these features to plastic prototypes.
Quantifying the Structural Benefits of Gussets and Ribs
Ribs and gussets seem like small features, but the FEA (finite element analysis) studies below demonstrate their importance from a structural standpoint.
Gussets
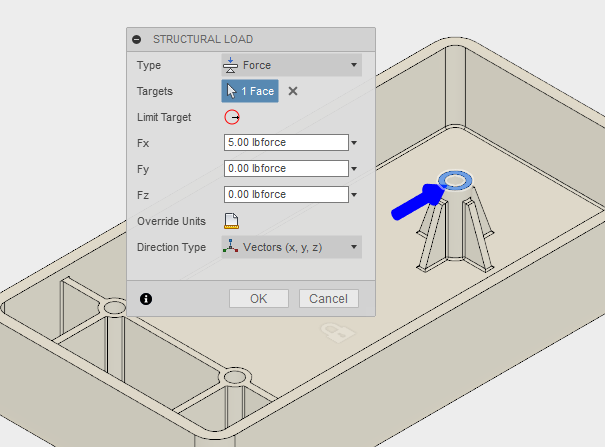
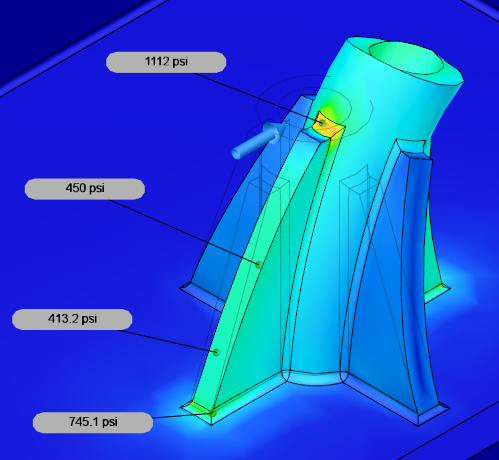
The image below depicts a five lbf (pound-force) load on the boss with gussets, to demonstrate total stress and deflection in the current state. All of these simulations use the material properties of ABS, so they’re consistent with common 3D printing materials.
As you can see in the results below, the majority of the part is stressed to the 400 psi range, with the maximum stress reaching just over 1,200 psi (not shown, as it is on the compressive side). The stress flags are all on the tension side, with the high tensile stress in the range of 1,100 psi.
In the following images, we can see the same FEA study conducted without the presence of gussets, and the stresses are now more than double what we saw in the prior study. This indicates that without gussets, the boss is less than half as strong.
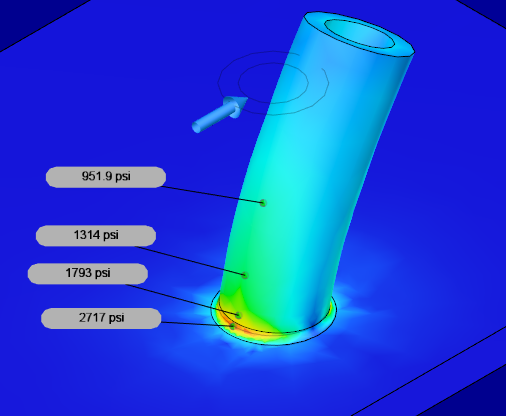
It’s immediately apparent that the feature becomes much weaker without the gussets. In fact, this feature is now very near the yield strength of the ABS we have selected (2,900 psi).
In addition to the increase in strength, the parts undergo much less deflection when we add gussets—for applications that require positional alignment or rigidity, this is very important. The side by side images below show just how much more the un-gusseted boss deflects.
We can see that the boss deflects four times as much at the top surface when it has no gussets. This can be a major problem for both function and aesthetics.
Gussets do not always have to appear angled, as shown above. They can also be straight features, as detailed in the image below:

Ribs
Our next example shows another way we can use ribs when not attached to a boss. Let’s start by looking at two different versions of a shelf:
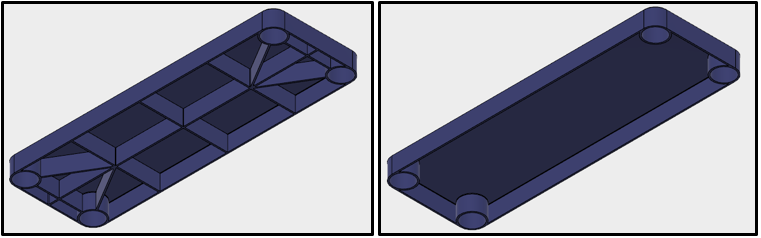
The shelf on the left features added support ribs, while the shelf on the right has all of the ribs removed.
By now, you’ve probably figured out that ribs will add strength and rigidity to the shelf, but can such thin features really provide that much support?
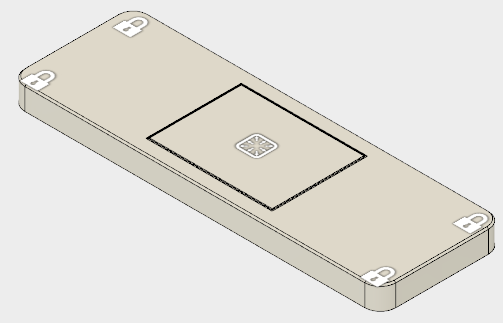
To quantify the benefit of our ribs, we’ll conduct another FEA study. In this study, we’ll analyze the impact of a 50 lbf box with base dimensions of approximately 6″ x 8″. We’ll use ABS for the shelf material again and simulate the support legs of the shelf by fixing the flat inner circle of the leg supports.
The setup is shown below:
We’ll start out by solving the FEA with the ribs included to locate the high stress regions. This information will be used to drive our safety factors, as well.
For this design, I want to target no less than a 3:1 safety factor, since it’s load bearing. The image below details the results of the study:
Listen beautiful relax classics on our Youtube channel.
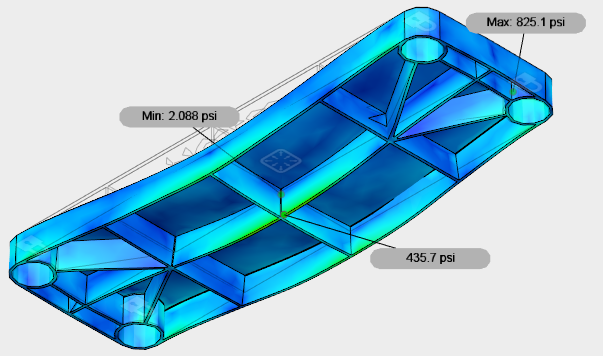
The maximum stress is 825.1 psi, located in the round features that are used to support the legs of the shelf. Given that we’re using ABS with a yield strength of 2,900 psi, our safety factor is 3.5, which exceeds our requirements.
In the next image, we’ve run the same FEA study on the shelf without the additional support ribs.
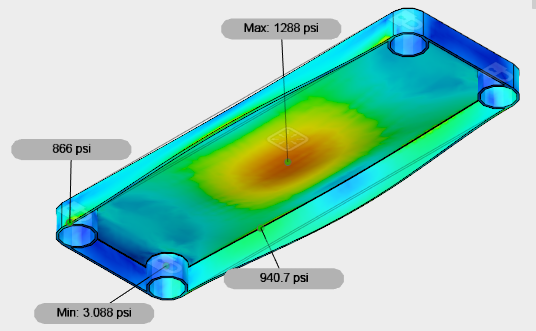
Here, we see the stresses shoot up to 1,288 psi, and many other locations within the shelf are stressed to a much higher level, as well. Our safety factor has also been reduced to 2.3, which is well below our requirement.
The safety factor and load rating aren’t the only factors we’ll look at. Once again, we’ll visit deflection because excessive deflection will be unattractive and less stable than a flatter shelf.
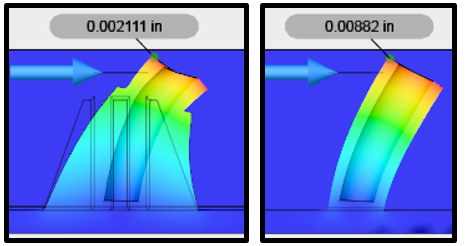
In the image below, the top picture is of the loaded shelf with ribs, and the bottom picture is of the shelf without the additional ribs.
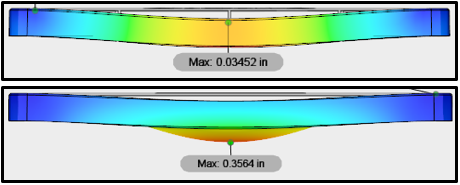
We can see that not only is the maximum displacement an order of magnitude higher in the shelf without ribs, but the center of the shelf is sagging like a bag. These illustrations are exaggerated to detail the direction of deflection, but 0.35″ is an unacceptable amount of deflection, in any case.
The Proper Application of Ribs
Now that we’re clear on the importance and benefits of ribs, it’s important to understand their proper application as ribs added in the wrong direction or orientation are often useless.
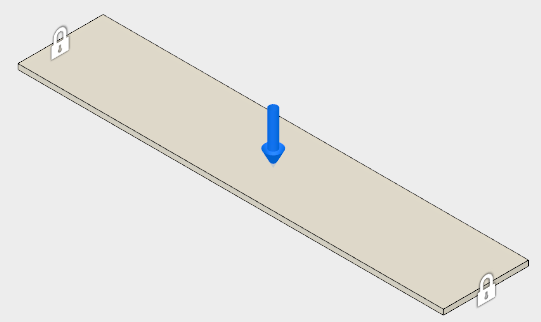
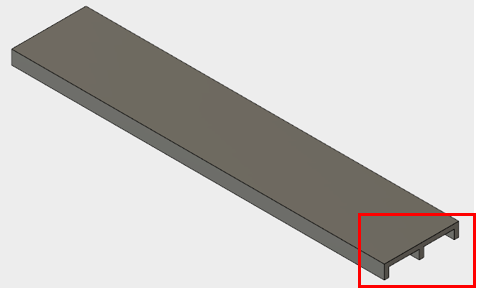
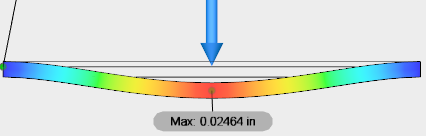
To demonstrate this, we’ll look at a plate that’s supported on both ends as shown below, with a ten lbf load placed in the middle.
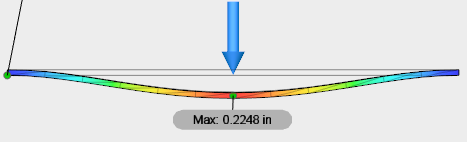
After solving the FEA, we can see quite a bit of deflection under such a low load. The following image details our results:
So, we know we need ribs. At this point do we just start throwing lines and extrusions on the part at random?
Mathematically, it’s best to add height in the direction of loading, so that means if we’re looking at the part from the front, as shown above, we want the part to look taller from the addition of ribs.
In the image below, you can see I’ve added three ribs that are 0.25″ tall.
If you guessed that we were going to run another FEA study, you are absolutely correct! The image below is of the same FEA study as above, but with our newly added ribs:
We’ve cut our total deflection down by almost an order of magnitude again, simply by adding three small ribs!
Now, let’s look at the wrong way to add ribs. We can see that the ribs in the study above were all connected to support features and had increased height in the direction of loading. Now let’s investigate what happens if we change the direction of the ribs 90 degrees, as shown below:

Yet again, we will turn to our trusty FEA study to see what happens when we place the same load on this component:

In this study, we can see that we get little to no benefit from these ribs because they don’t actually connect to any of the support features.
The deflection is barely less than our original case, with no ribs at all. If the shelf were fixed on the front face, these ribs would actually help, but in these studies, the shelf is only supported on the left and right ends.
Design Guidelines
Ready to test physical prototypes of your designs? The design guidelines for 3D printed parts are relatively simple:
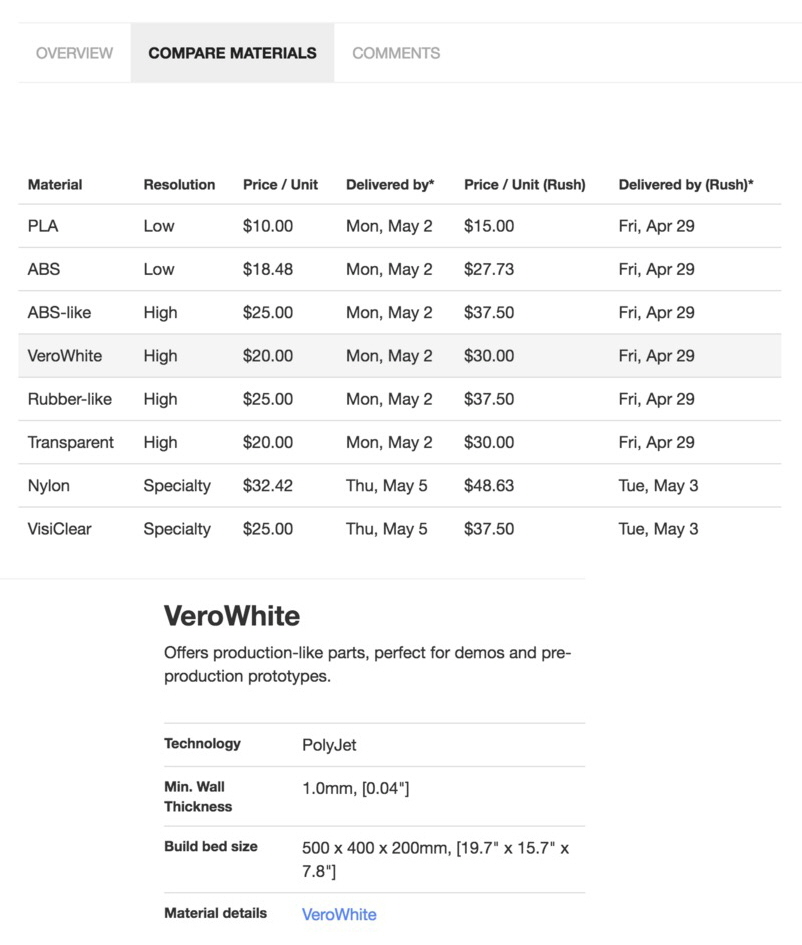
– Ensure that wall thickness is within the recommended guidelines of the machine and/or process you will be using. If you’re using the Fictiv platform, this information will be found under the compare materials tab in your part details page:
– On long, thin-walled sections, ribs may also prevent warpage that is induced during the fabrication process.
– No draft angle is required, so wall thickness can be held constant where necessary.
– For production, keep in mind that injection molded parts face a different set of requirements because the manufacturing challenges are much different.
– I’ve summarized some of the guidelines found here that are specific to ribs and gussets:
– Rib thickness should be 60-80% of wall thickness.
– To increase stiffness, it’s advisable to increase the total number of ribs instead of the height (in some instances, this may not suffice).
– Rib height should be limited to three times the wall thickness or less, where possible (this may also be unavoidable in some load cases).
– Core out thick ribs and/or rib intersections to maintain constant wall thickness.
Main Takeaways
The addition of ribs and gussets greatly improves plastic parts’ strength, without adding too much material that might lead to longer build times for 3D printers or manufacturing defects for injection molded parts.
Of course, the improper application of ribs provides little to no benefit, so the best way to get a feel for incorporating ribs is to play around with your designs and, of course, iterate early and often!
___________________
This post is provided by Fictiv, the most efficient manufacturing platform for fabricating parts. Powered by a distributed network of highly vetted vendors, the online interface makes it easy for customers to get instant quotes, review manufacturing feedback, and manage orders—all through a single service.
![]()
Source: core77